


Alvar 61″ Oak 6-Drawer Chest(Set of 2)


Alvar Arched 61" Oak Sideboard with Drawers(Set of 2)

Alvar Arched 91″ Oak Modular Media Console(Set of 3)

Charlie Sintered Stone Nightstand 26" W


Ethereal Crystal Radiance Round Chandelier 30"D


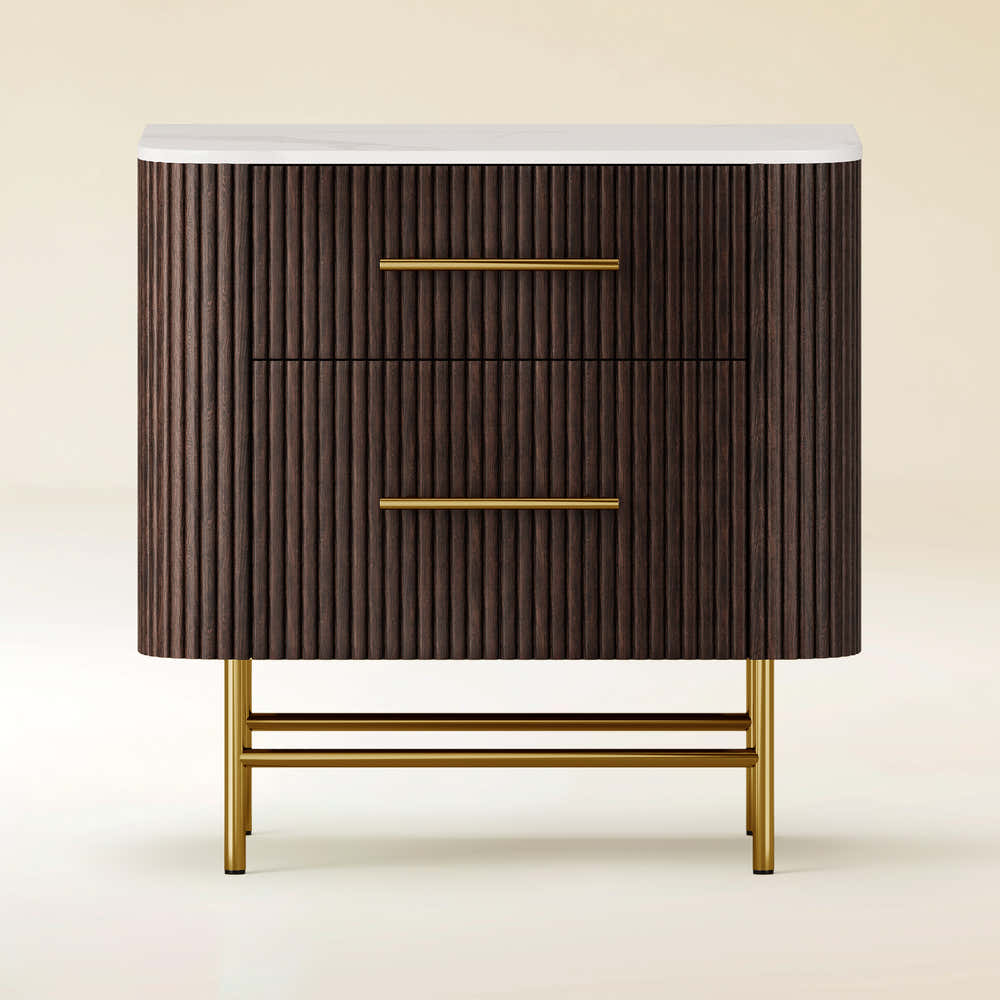
Ewan 63" Oak Slatted Sideboard Buffet Cabinet
Ewan Sintered Stone Nightstand 26"W

Holt 63″ Solid Oak Console(Set of 2)

Holt 95″ Solid Oak Console(Set of 3)

Moira Alabaster Round Chandelier 24"D

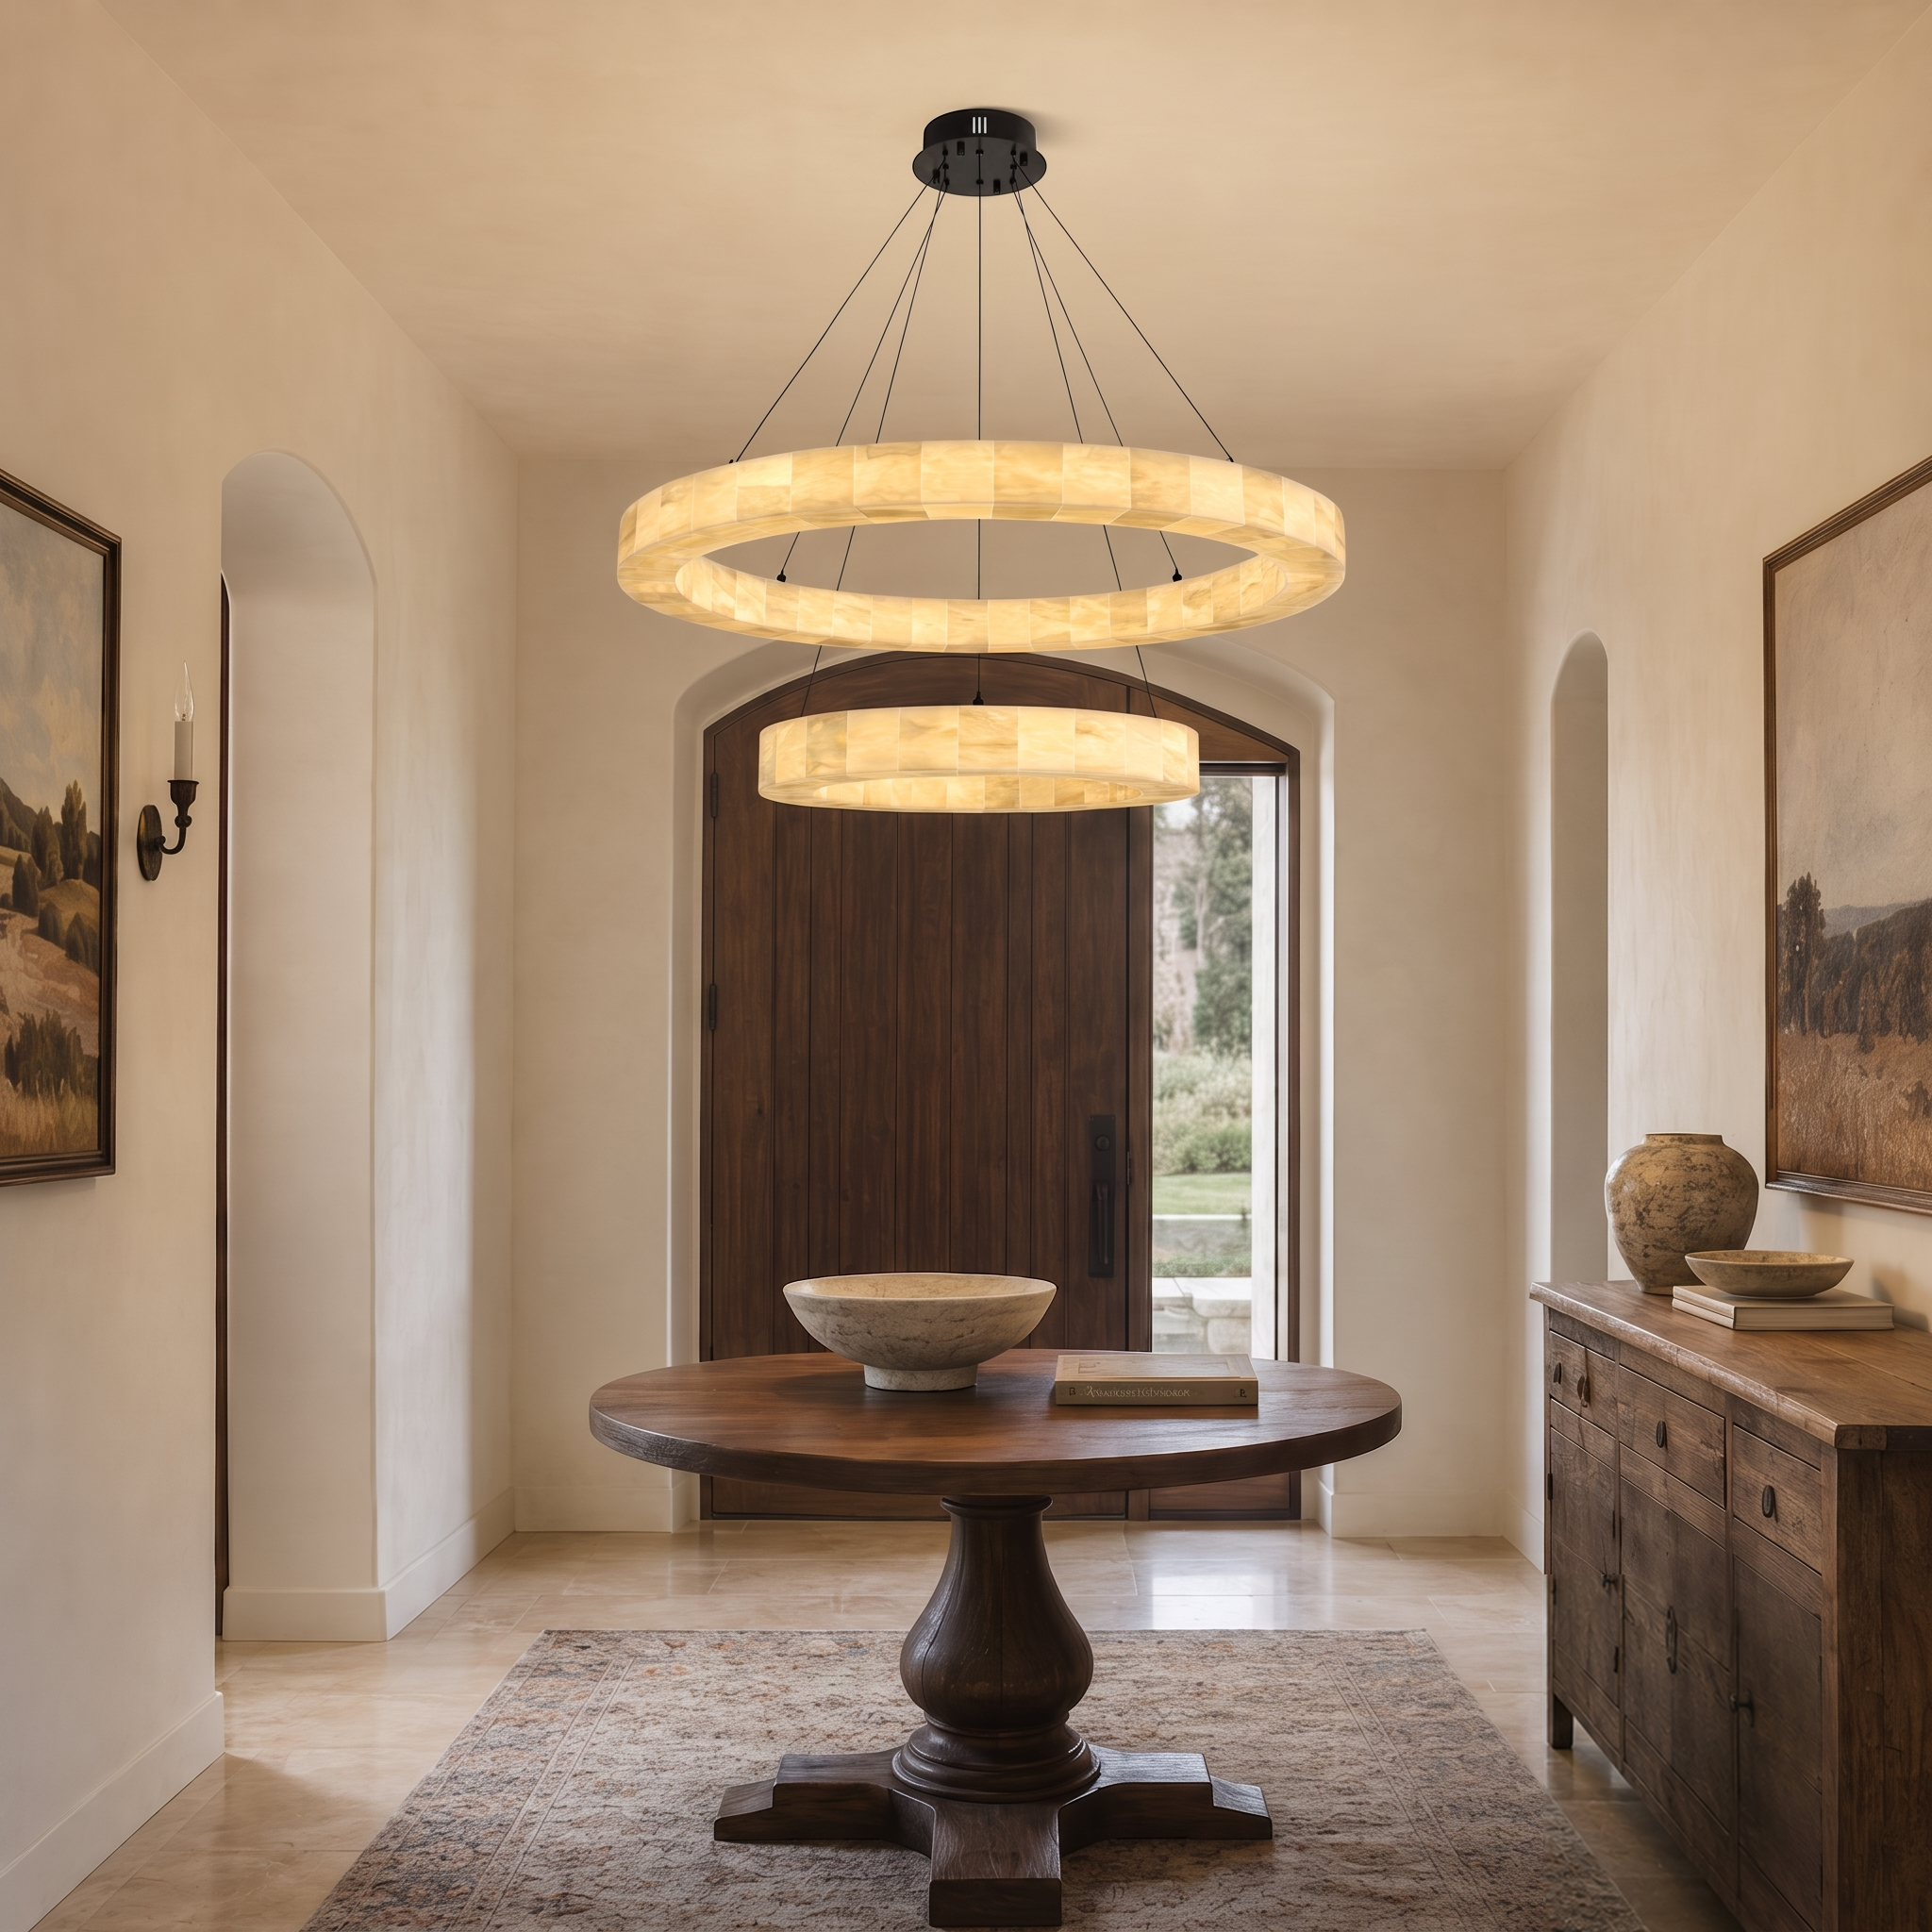
Moira Alabaster Round Chandelier 32"D

Silas Extendable TV Stand 80" to 110"

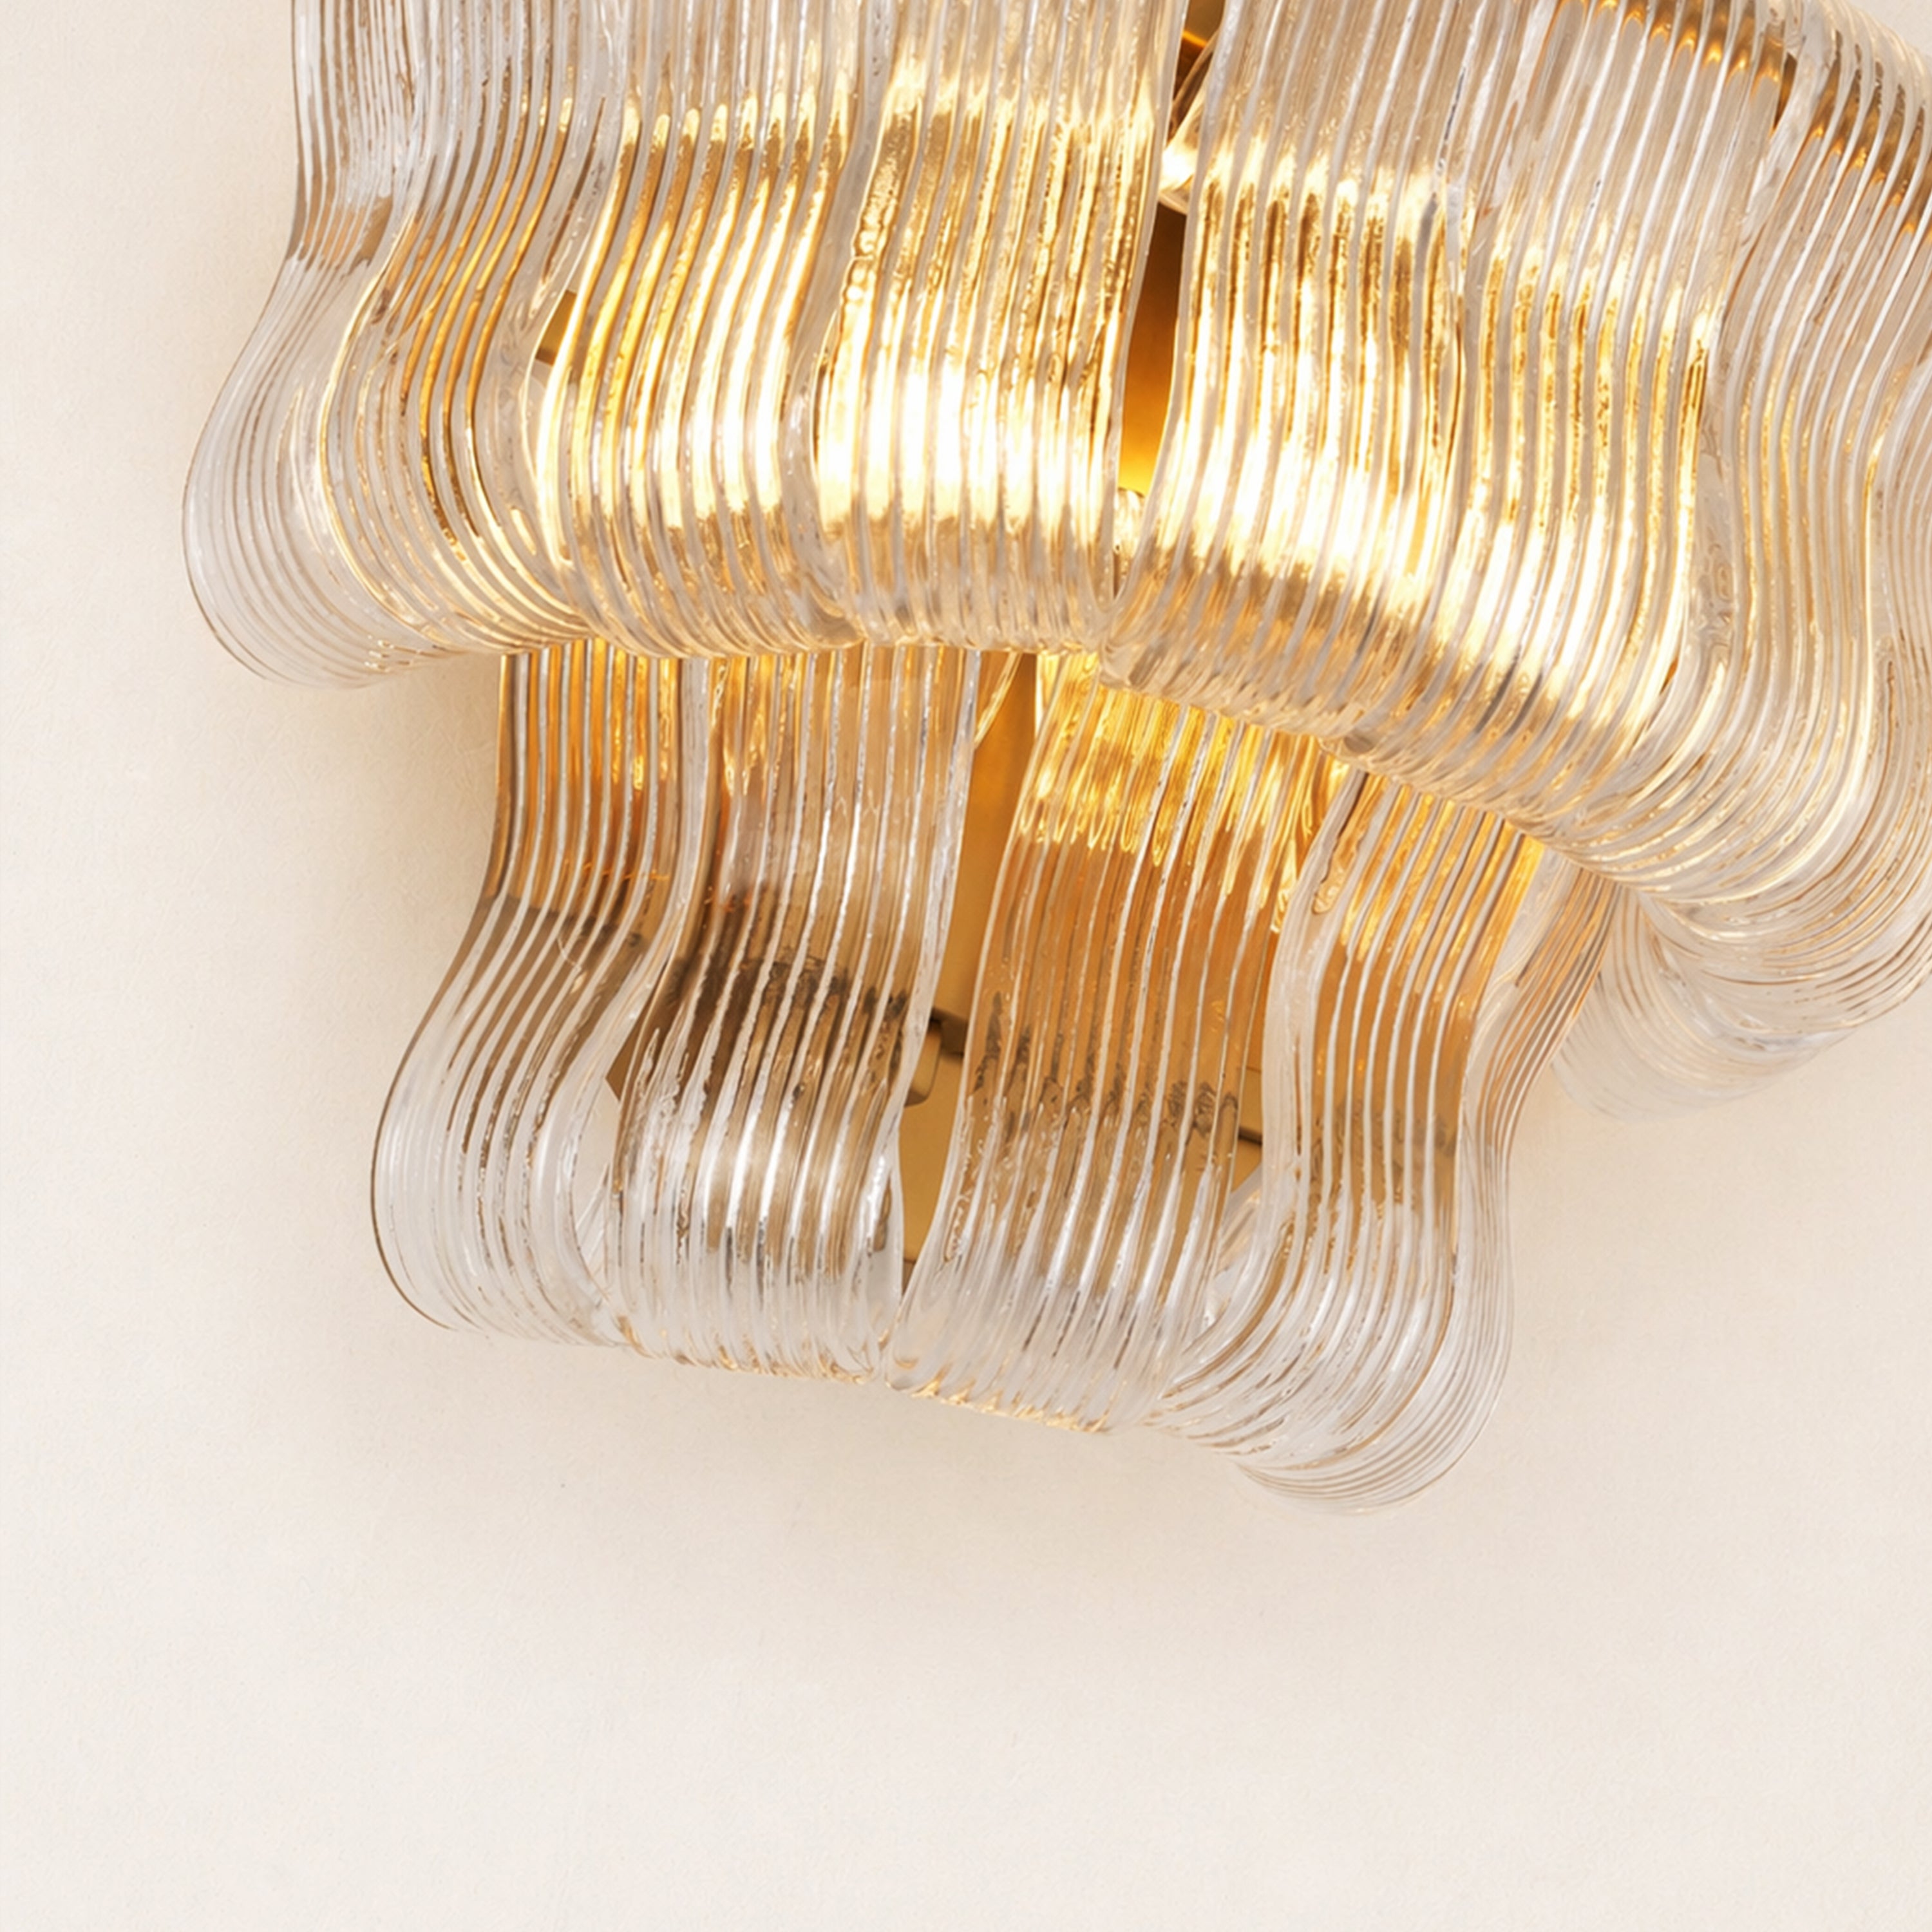
Stellara Crystal Strip Round Chandelier 24"D

Sylvia Palladian Alabaster Wall Sconce 20"H

Alvar Arched 91″ Oak Media Console(Set of 3)

Ewan Oak Extendable Media Console 79" to 110"

Holt 126″ Solid Oak Console(Set of 4)

FSC FCOC47059 . FSC is dedicated to the promotion of responsible forest management
worldwide. By selecting this product, you help take care of the woorld's forests

UL-certified for indoor drying environments not directly exposed to excessive moisture or water;
Use in the United States and Canada.

Certified to Dry ETL electrical standard: suitable for use indoors in dry locations not directly exposed to excessive moisture and water
Use in the United States

CE-certified drying equipment compliant with electrical standards: Suitable for indoor drying environments not directly exposed to excessive moisture or water;
Tested for use in Europe, the UK, and other regions.


The support center has answers to questions you may have. You can also contact customer service in the support center if you can't find what you're looking for.
Support Center >
At houlte, we are committed to delivering quality, style, and great value to our customers. Our goal is to simplify your shopping experience by providing competitive prices and exceptional service.

If an item you purchased from houlte goes on sale on our website within 30 days of your purchase date, you may request a price match. This policy ensures you always receive the best value when shopping with us.
Houlte reserves the right to interpret and adjust the terms of the Price Match Policy as necessary.
Houlte has partnered with Taskrabbit to make your everyday life at home easier by connecting you with flexible and affordable ways to get your to-do’s done including furniture assembly and mounting.

1. Purchase your furniture at Houlte.
2. Check your order Dispatched and Delivered email and click the
Houlte link. You will be redirected to Taskrabbit's landing page.
3. Post your task on Taskrabbit platform.
4. Pick the best tasker to assemble your furniture.
Houlte has partnered with Taskrabbit to make your everyday life at home easier by connecting you with flexible and affordable ways to get your to-do’s done including furniture assembly and mounting.
Taskrabbit Assembly is available in most metro areas in the US. The availability of Taskers varies based on demand. When placing an order on Taskrabbit, you will need to enter your zip code. If the service is not supported in your area, you will not be able to place an order.
You can book assembly for your Houlte furniture as early as the next day after your delivery, and up to 14 days in advance, giving you flexibility to choose a time that works best for you.

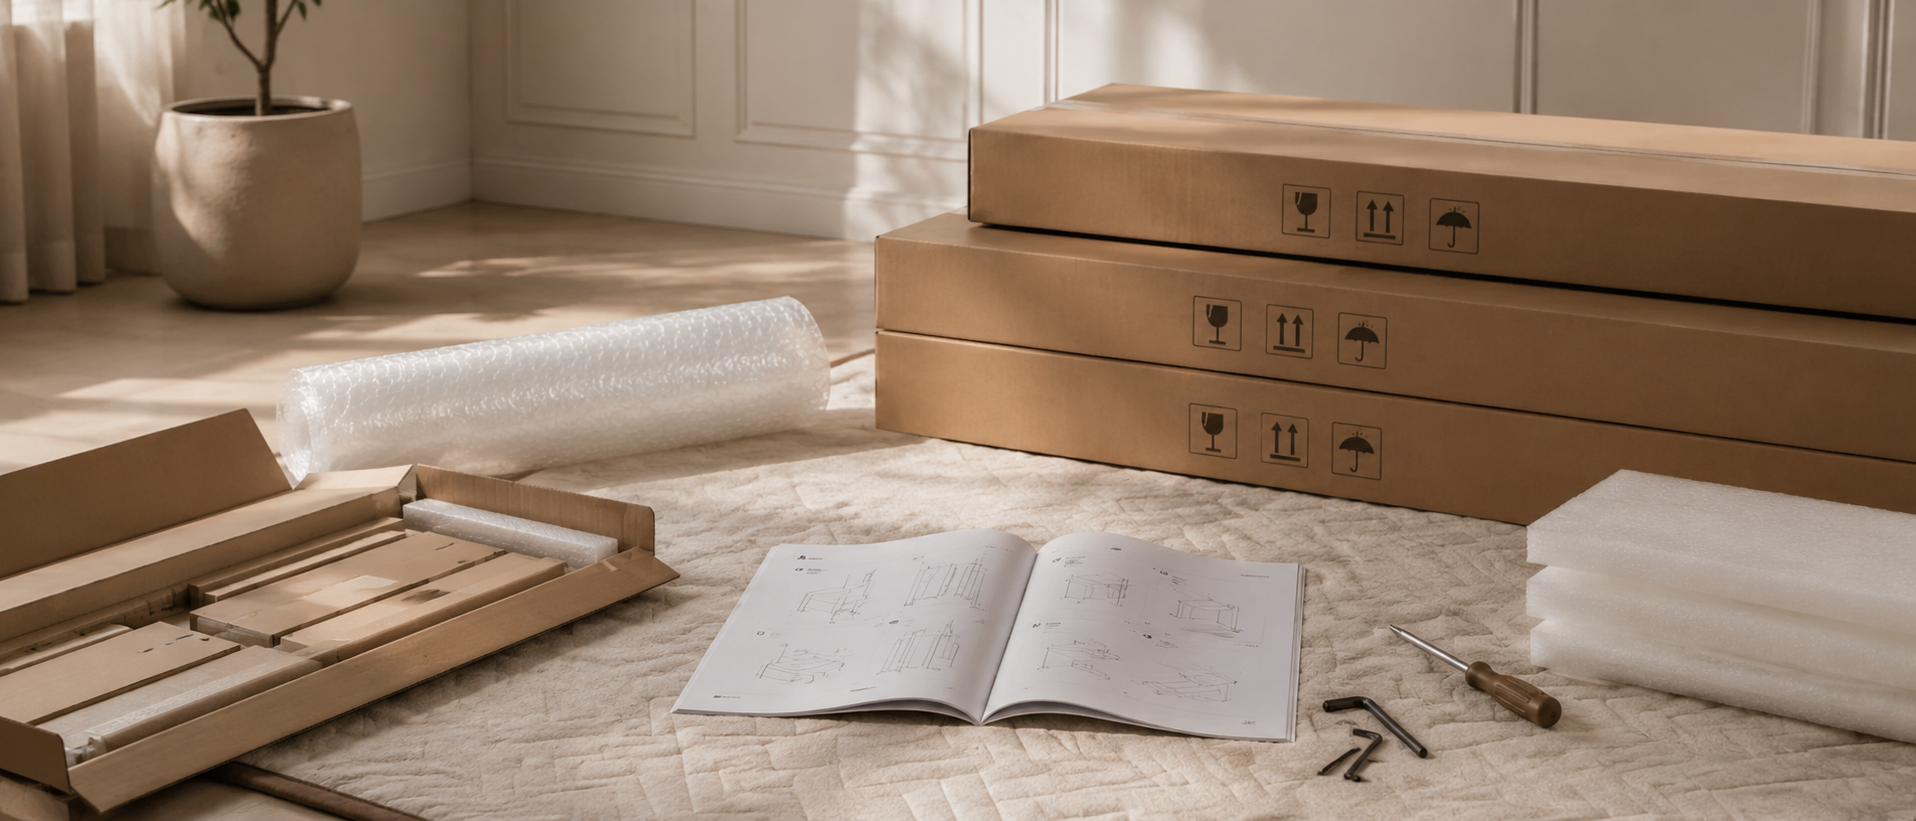
Ready to use out of the box; minimal installation may be required (e.g., handles).

Main structure is pre-built; minor components require attachment (e.g., legs).

Assembly required; multiple parts must be assembled before use.
Our furniture is built with a combination of core boards, real wood veneers, and selected solid wood parts. Each material is used for a different purpose—structure, surface appearance, or visible strength—so the final piece feels balanced in performance, finish, and cost.
Core boards form the internal foundation of the furniture. They provide structure, stability, and efficiency across large surfaces and cabinet bodies.

Stable structural board

Smooth and consistent

Functional internal board
Selected solid wood parts are used where visible strength, tactile quality, and structural integrity matter most—such as legs, frames, trim, and exposed support details.

Durable and classic

Light and versatile

Premium and elevated
Kitchen renovations need precision and skill, mainly when securing work surfaces. The key to a great kitchen is mounting techniques that last. They ensure stability and longevity.
Knowing cabinet attachment methods is key for both homeowners and pros. Bad installation can cause expensive fixes and safety risks later.

This guide shares pro secrets on mounting systems. You'll learn methods contractors use for solid installations. Each method fits different materials and kitchen setups.
Whether you're doing it yourself or watching pros work, this knowledge is crucial. Our guide covers basics to advanced countertop installation strategies. You'll feel confident in your kitchen investment choices.
Getting pro-quality results is possible when you know the basics. This guide breaks down complex installation into simple steps. It ensures lasting performance.
Knowing how cabinets and countertops work together is key to a good kitchen renovation. It's important to see how cabinet frames and countertops fit together. This helps choose the right countertop fasteners for a strong and lasting bond.
"The strength of any countertop installation is only as good as the cabinet structure supporting it."
Installers need to know the basics of cabinet styles to avoid mistakes. This knowledge helps spread the weight evenly and prevents damage.
Cabinets can be face-frame or frameless. Face-frame cabinets have a wooden frame on the front. This frame helps secure the countertop.
Frameless cabinets, on the other hand, use the sides and inside for support. They need special fasteners and might need extra support for heavy countertops.
Countertops made of different materials face different challenges. Laminate is light and easy to attach with screws. But stone, like granite and quartz, needs special countertop fasteners because it's heavy and can break.
Wood countertops change size with humidity. They need special fasteners that let the wood move but stay attached.
Even weight is crucial to avoid damage. Standard cabinets can hold about 600 pounds with the right support. Heavy countertops might need extra brackets every 24 inches.
Knowing how much weight a cabinet can handle is important for your renovation. It helps decide if you need to add extra support.
To mount countertops securely, you need the right tools. These tools must fit the countertop material and the cabinet. Professional installers use a wide range of tools for precision, safety, and durability.
Choosing the right tools is key to a successful installation. Each tool has a specific role in making strong connections. Knowing which tools to use for each material helps avoid mistakes and ensures top-quality results.
Power tools are crucial for efficient countertop mounting. They offer the precision and power needed for different materials.
A circular saw with fine-tooth blades makes precise cuts. This is important for fitting around obstacles and creating clean edges. Professional-grade saws give consistent results with various countertop materials.
Routers make smooth edges and precise cutouts for sinks and cooktops. Using the right bits in variable-speed routers prevents chipping or splintering.
High-torque drills make pilot holes in dense materials. Cordless drills offer mobility and consistent power for long sessions.
Impact drivers provide extra torque for driving screws. They prevent cam-out and ensure tight connections without over-driving fasteners.
Hand tools add precision and control to the installation process. They complement power tools in critical steps.
Specialized clamps keep things aligned during adhesive curing and mechanical fastening. C-clamps, bar clamps, and spring clamps each have their own role in countertop installation.
Professional fasteners include:
Precision levels ensure perfectly horizontal surfaces. Digital levels provide exact readings, eliminating guesswork in measurements.
Framing squares and speed squares check right angles and guide accurate cuts. These tools prevent alignment issues that compromise installation quality.
Using proper safety equipment is crucial for protecting against injury and health hazards. Safety glasses protect eyes from debris and dust.
Dust masks or respirators prevent inhaling harmful particles, important when working with engineered stone. Heavy-duty work gloves protect hands while maintaining dexterity for precise work.
Knee pads and back support reduce strain during long installation periods. Professional installers consider safety equipment essential for their toolkit.
Good planning before installation saves money and ensures a smooth job. This step involves checking the cabinets and taking precise measurements. This helps avoid surprises that could slow down your project.
Spotting problems early is key to a successful countertop job. Pros spend a lot of time checking for issues. This way, they can fix things before they cost more later.

Measuring right is more than just length and width. Use a laser level to find wall and floor issues. Make cardboard or plywood templates to check sizes before cutting the countertop.
Check if cabinets are square by measuring diagonally. Take many measurements along each cabinet. Note any big differences that need fixing.
Look for loose joints or if cabinets are not attached right. Push on corners gently to see if they move. Fix any loose cabinets before you start installing the countertop.
Use a 4-foot level to check if cabinet tops are level. Mark spots that need shimming or adjusting during installation.
Choose seam spots wisely to hide them and keep things strong. Place seams away from stress points like sink cutouts. Plan seams to fall over cabinet walls, not open spaces.
| Seam Location | Structural Support | Visibility Rating | Installation Difficulty |
|---|---|---|---|
| Over Cabinet Wall | Excellent | Low | Easy |
| Corner Junction | Good | Medium | Moderate |
| Open Span | Poor | High | Difficult |
| Near Appliances | Variable | Medium | Complex |
Keep track of what support each seam needs. This includes extra brackets for heavy materials like granite or quartz.
Before you attach any countertop, you must check and fix the cabinet. This step is key to a successful installation. Many DIY countertops fail because they don't prepare the cabinets right.
Preparing cabinets involves three main steps. Each step is important for a strong base. Skipping these steps can lead to expensive fixes later.
Weak cabinet frames need extra support to hold the countertop. Use corner brackets inside to make joints stronger. Also, add mounting rails on top to spread the weight.
Make sure to check for loose screws or damaged wood first. Fix any problems right away. Solid wood strips are better than particle board for support.
Materials like stone need more countertop support than regular cabinets. Put metal brackets every 18 inches along the cabinets. Place them where the countertop seams and overhangs are.
Choose heavy-duty brackets that can handle your countertop's weight. Attach brackets to the cabinet frame, not just the top.
Level surfaces prevent cracks by avoiding uneven stress. Use shims for small height differences. Sand high spots carefully to keep the structure strong.
Use a long straightedge to check if the cabinets are level. Even small differences can cause issues during installation.
Knowing how to attach countertops to cabinets is key for a good kitchen remodel. Pros pick the right method based on the countertop, cabinet, and environment. Each way has its own benefits for different situations.
Choosing the right method means looking at weight, material fit, and how well it lasts. Today's methods mix old-school fasteners with new adhesives for the best results.
Mechanical fasteners give strong, adjustable holds that fit most countertops. They're easy to take out and put back if needed. They spread the weight evenly on the cabinet.
Screws and brackets are the go-to for laminate and solid surface countertops. Installers screw through blocks into the countertop's underside. This method holds strong and allows for small adjustments.
L-brackets on cabinet sides add extra support. They're great for overhangs and unsupported edges.
Figure-8 fasteners let solid wood countertops move with the seasons. They clip to the cabinet, allowing for movement. This stops cracking and warping from wood changes.
Modern adhesives make a strong bond between countertops and cabinets. They're perfect for heavy stone and engineered materials. Making sure the surface is ready is key for a strong bond.
Silicone adhesives offer flexible bonds that handle building movement. Construction adhesives grab fast and last long. Both resist moisture and temperature changes found in kitchens.
Epoxy adhesives make the strongest bonds for tough jobs. They cure to form rigid connections that spread loads well. Professional mixing and application ensure they work well and avoid failures.
Using both mechanical and adhesive methods gives stability and long-term strength. This is good for heavy countertops that need extra support. The fasteners hold tight right away, and the adhesives get stronger over time.
| Attachment Method | Best Applications | Advantages | Considerations |
|---|---|---|---|
| Screw and Bracket | Laminate, Solid Surface | Adjustable, Removable | Visible fasteners |
| Figure-8 Fasteners | Wood Countertops | Allows movement | Requires precise placement |
| Silicone Adhesive | Stone, Quartz | Flexible, Waterproof | Permanent installation |
| Epoxy Systems | Heavy Materials | Maximum strength | No adjustability |
Laminate countertops need special installation methods. They have decorative layers and a particle board core. This requires careful handling to avoid delamination. Knowing these details and using the right fastening techniques is key to a successful installation.
Start by placing the countertop without touching any adhesive. Use supports to hold it about an inch above the cabinets. This makes it easier to adjust before final placement.
Double-check all measurements against your cabinet layout during dry-fitting. Make sure cutouts fit perfectly with sinks and appliances. Mark any spots that need adjustment before attaching the countertop.

Drill pilot holes with a bit smaller than your screw. This helps avoid cracking the laminate. Place holes 6 inches from edges and 12 inches apart on cabinet frames.
Use sharp drill bits made for laminate to avoid damage. Apply steady pressure without forcing the bit. Support the laminate from underneath to prevent chipping.
Choose screws that go at least 3/4 inch into the cabinet frame. Don't go through the countertop. Standard 1.25-inch screws are usually good for most installations.
| Countertop Thickness | Recommended Screw Length | Pilot Hole Size | Spacing Distance |
|---|---|---|---|
| 3/4 inch | 1.25 inches | 1/8 inch | 12 inches |
| 1 inch | 1.5 inches | 1/8 inch | 12 inches |
| 1.25 inches | 1.75 inches | 5/32 inch | 10 inches |
Use a router with a laminate trimming bit for clean edges. Work slowly to avoid damage. Sand any rough spots with fine-grit sandpaper for a smooth finish.
Apply edge banding or trim pieces for moisture protection. Use contact cement for a strong bond that matches your installation techniques.
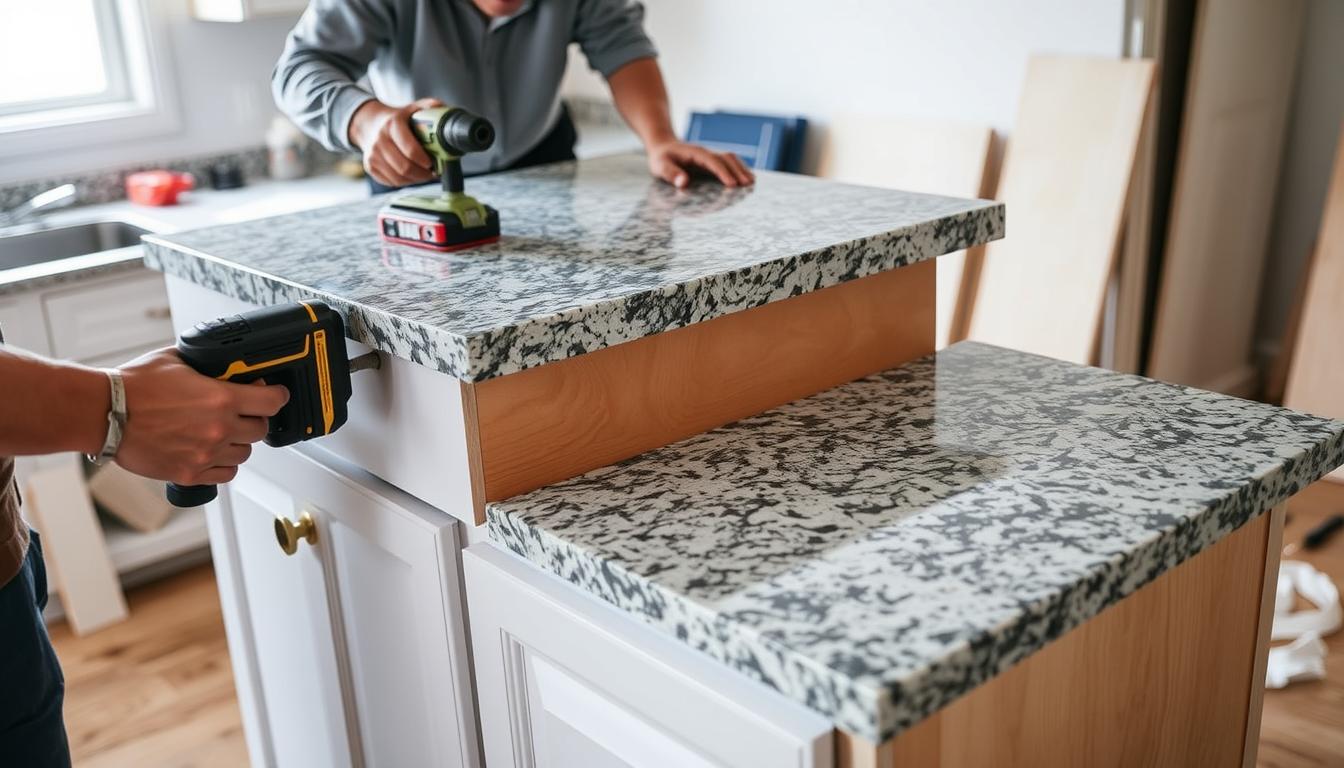
Stone and quartz countertops are very heavy and need special care. They weigh between 18 and 25 pounds per square foot. This makes them hard to handle, but with the right skills, they can be safely installed.
Moving these countertops needs teamwork and the right tools. Installers use suction cup lifters and dollies to move them safely. Never try to lift them alone – it takes at least three people.
When placing them, use temporary supports to avoid damage. This helps prevent cracks from happening during installation.
Silicone adhesive is key for attaching quartz countertops. Use a high-grade adhesive made for heavy countertops. It must bond well with the stone and cabinets.
Put silicone beads along the edges where the countertop meets the cabinets. Keep the beads about ¼ inch wide for best coverage. Make sure there are no gaps in the adhesive.
Let the adhesive cure for at least 24 hours before putting weight on the countertop. Weather conditions can affect how fast it cures. In tough weather, installers might wait 48 hours.
Undermount clips are vital for sink cutouts and heavy fixtures. Put clips every 6 to 8 inches around sinks. They help spread the weight and prevent sagging or cracking.
Place clips flat against the countertop and then tighten. Use the right fasteners to hold them in place. This is key for a successful quartz installation.
Big stone countertops might need seams for easier handling. Place seams in low-stress areas, like away from sinks or cooktops. A pro can make these seams almost invisible.
Support both sides of the seams while the adhesive cures. Use special compounds that match the stone's color and pattern. This makes the countertop look like one piece.
Solid wood surfaces face unique challenges. Wood countertops change size with humidity changes. This means they need special ways to attach to prevent damage.
Installers must plan for these changes. Regular fasteners can harm the countertop over time. The goal is to let it move a bit while keeping it strong.
Wood moves differently based on its grain direction. It expands more across the grain than along it. A 24-inch wide butcher block might grow up to 1/4 inch in humid summers.
Each wood type moves at its own pace. Hardwoods like oak and maple move a bit. Softer woods can move more, needing extra care.
Expansion fasteners are the best choice for attaching wood countertops. They have a special design that lets the wood move. This keeps the countertop from moving or lifting.
Place fastener slots across the grain direction. This lets the wood expand as it should. The wrong placement can cause the wood to split or warp.
Figure out how much the wood will move based on your area's weather. Places with more humidity need more room for movement. Put the fasteners so the countertop can move equally in both directions.
| Fastener Type | Movement Allowance | Best Application | Installation Depth |
|---|---|---|---|
| Standard Figure-8 | 1/8 inch | Narrow countertops | 3/4 inch |
| Extended Slot Figure-8 | 1/4 inch | Wide butcher blocks | 3/4 inch |
| Heavy-Duty Figure-8 | 3/16 inch | Thick wood slabs | 1 inch |
| Adjustable Bracket | 3/8 inch | Large installations | 1-1/4 inch |
Protecting against moisture is key. Use a safe wood finish on all surfaces before installing. Pay extra attention to areas where moisture can get in, like the end grain.
Edge banding adds a moisture barrier and looks good. Use wood that matches the countertop for a seamless look. Sealing well keeps the countertop and fasteners in great shape for longer.
Making invisible joints between countertop sections needs careful work. It's important for both strength and looks. Seam joining needs good planning and skill to look seamless. Big projects often need joints that last long.
Knowing how materials move and handle weight is key. Each material needs its own way to join. This ensures the countertop works well over time.
Start with exact measurements and cuts. Mark both sections before you place them. Use temporary supports to keep them at the right height.
Check the alignment from different sides with a straight edge. You can adjust by adding shims or sanding. The goal is to have surfaces that fit together perfectly.
Biscuit joints add a mechanical bond to the adhesive. They keep the sections together and aligned when you clamp them. Choose the right size based on the countertop's thickness and material.
Set your biscuit joiner to half the countertop's thickness. Mark slot spots every 6-8 inches. Keep the pressure and angle even for straight slots.
Spread adhesive evenly with a brush or applicator. Work fast, as most adhesives dry quickly. Don't put too much adhesive to avoid squeezing out during clamping.
Use bar clamps across the joint line. Apply pressure slowly to avoid damage. Check the alignment often to make sure the seam closes well.
| Joint Method | Strength Rating | Best Materials | Clamping Time |
|---|---|---|---|
| Adhesive Only | Good | Laminate, Solid Surface | 2-4 hours |
| Biscuit + Adhesive | Excellent | Wood, Bamboo | 4-6 hours |
| Mechanical Fasteners | Very Good | Stone, Quartz | 1-2 hours |
Even the most well-planned countertop projects face installation problems. Professional installers quickly spot these issues to save time and avoid costly errors. Knowing common problems helps both pros and DIY fans get great results.
Uneven cabinet tops are a common problem in countertop projects. These issues stop the countertop from fitting right and cause gaps. To fix this, you need special techniques to make the surface even.
Plastic shims help adjust the height of cabinets slightly. Place shims at corners and support points to level the surface. Use many thin shims instead of a few thick ones for better stability.
Belt sanders are great for smoothing out cabinet frames and tops. Focus on spots that stop the countertop from touching the cabinet. Sand slowly and check often to avoid making it worse.
Gaps between countertops and walls often come from measurement mistakes or building settling. Use adjustable brackets to pull the countertop closer to the wall. Fill any gaps left with matching caulk or trim for a clean look.
Alignment problems between countertop sections need careful fixing. Loosen the fasteners a bit, then adjust the section's position before tightening again. Make sure to check from different angles for a good seam.
Countertop repair often deals with stability issues that come up over time. If the countertop moves or sags, it's not supported well or the attachment points failed. Acting fast stops more damage and keeps the installation solid.
Put in more L-brackets every 18-24 inches on unsupported edges. Place them to spread the weight evenly across the cabinet frames. Use screws that go into the cabinet without showing on the surface.
When adhesive fails, clean and reapply it. Make sure to remove all old adhesive before putting on new. Adding mechanical fasteners with the adhesive helps hold it better and lasts longer.
To get a successful installation, you need to know the basics. Each countertop material has its own way of being attached. This depends on its properties and how heavy it is.
Going from planning to the final installation shows the importance of preparation. Knowing how to assess cabinets, choose the right tools, and use material-specific techniques is key. This turns hard projects into doable ones.
Stone, laminate, and wood all need different ways to be attached. Stone, like quartz, needs strong support and special adhesives. Laminate needs precise fastening and edge work. Wood countertops require special hardware and expansion checks.
Both pros and DIY folks should follow a step-by-step plan for each project. Being accurate with measurements, checking levels, and using the right fasteners avoids common mistakes. This keeps countertops safe and working well for years.
Using top-notch tools and materials means fewer callbacks and happier customers. The right techniques make installations last through daily use and changes in the environment. This guide gives you the confidence to handle countertop projects.
Every good installation starts with knowing about cabinets and ends with paying attention to the details. This method leads to professional results, no matter the material or project size.
There are a few main ways to attach countertops. You can use screws and brackets, adhesive like silicone, or a mix of both. Laminate countertops usually get screws from underneath. Stone and quartz use silicone, while wood needs special fasteners for movement.
Check if your cabinets are strong enough for stone. Look at the face frames, bracing, and how much weight they can hold. Stone is heavy, so your cabinets need to be sturdy. Make sure they're well-supported and can handle the weight.
You'll need a circular saw, router, drill, and impact driver. Also, clamps, levels, and safety gear are crucial. For stone, you might need special tools like suction cup lifters and diamond blades.
Wood moves with humidity changes. It needs special fasteners that let it move but stay attached. Regular fasteners can cause damage. The right fasteners help wood move without problems.
To hide seams, align sections perfectly and use biscuit joints. Apply adhesive right and clamp well. Make sure everything is level and supported while the adhesive sets.
If your countertop is loose, add support brackets or improve the adhesive. Check why it's loose. You might need more brackets, better adhesive, or a mix of both.
Make sure your cabinets are ready by reinforcing weak spots and adding brackets. Ensure the surface is level and strong. Use shims for small adjustments and sand for big ones.
Use silicone adhesive in beads along the edges. Make sure it covers evenly and allows for movement. Wait for the adhesive to cure before using the countertop.
Undermount sinks need support clips for weight distribution. Plan where to put the clips during cabinet prep. Make sure they fit around plumbing and support the sink's weight.
Always lift heavy materials safely and wear protective gear. Use ventilation with adhesives and have help for heavy stones. Follow safety guidelines for tools and materials.


Share:
Does Flooring Go Under Cabinets?
Hang Cabinets Like a Pro: Easy DIY Tips